
If you love fresh ginger and enjoy a bit of indoor gardening, growing ginger in pots at home might be the perfect project for you. It’s simple, satisfying, and gives you a steady supply of this aromatic root right from your kitchen. Whether you’re a beginner or a seasoned gardener, this step-by-step guide will help you grow ginger at home like a pro.
🌱 What You’ll Need
- Fresh ginger rhizomes (plump and budding)
- A shallow plastic container or bowl
- A large pot with a drainage hole
- Potting soil mix (well-draining and loose)
- Landscape fabric (optional)
- Paper towel
- Watering can
- Wood chip mulch or sawdust
✅ Step 1: Choose the Right Ginger Rhizomes
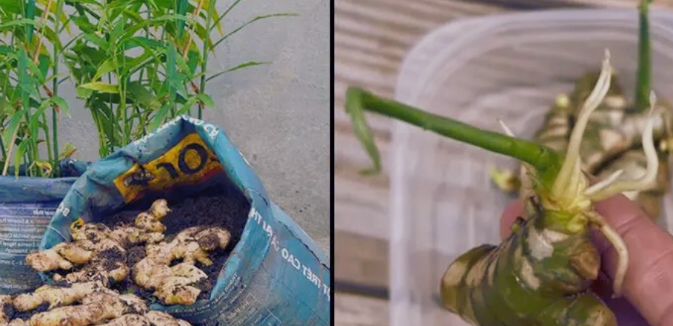
Start by selecting healthy, plump ginger rhizomes with visible buds or “eyes.” These little nubs are where new shoots will emerge. If your piece has multiple buds, you can cut it into sections—each one can become its own plant.
✅ Step 2: Soak to Spark Sprouting
Place the ginger pieces in a shallow container. Add a little water—just enough to touch the bottom of the rhizomes—and cover the top of the container with a damp paper towel. This setup helps create a moist environment that encourages sprouting.
🌀 Pro tip: Change the water every 2–3 days to keep it fresh and prevent mold. You should see tiny green shoots within 10–14 days.
✅ Step 3: Pick the Perfect Pot
Once your ginger starts to sprout, it’s time to plant. Choose a large, wide pot—ginger grows horizontally, so it needs space to spread out. Make sure the pot has a drainage hole to avoid soggy roots.
✅ Step 4: Prep the Pot for Planting
- Place a piece of landscape fabric over the drainage hole (optional but helpful). This keeps the soil in while allowing excess water to drain.
- Fill the pot with a loose, rich potting mix. You can mix in some compost for extra nutrients.
- Leave about 2 inches of space at the top so you can easily plant and water.
✅ Step 5: Plant Your Ginger
Place the sprouted ginger 2–4 inches deep in the soil, with the buds pointing upward. Space them out if planting multiple pieces in the same pot.
- Cover lightly with soil, leaving the green tips just peeking out.
- Water gently to settle the soil and keep it evenly moist.
✅ Step 6: Mulch and Maintain
To keep the soil moist and regulate temperature, add a layer of wood chip mulch or sawdust. This also helps reduce evaporation and adds organic matter over time.
Water consistently—ginger likes moist but not soggy soil. Too much water can lead to rot, so make sure the pot drains well.
🌿 Ongoing Care
- Sunlight: Place your pot in a warm, bright spot with indirect sunlight. Ginger loves warmth but not scorching sun.
- Feeding: Every few weeks during the growing season, you can feed your plant with a diluted liquid fertilizer or compost tea.
- Patience Pays Off: Ginger takes time to mature—usually around 8–10 months. But the wait is well worth it!
🫚 Enjoy Your Homegrown Ginger
Growing ginger at home is a rewarding and fun way to enjoy fresh, flavorful spice right from your windowsill or patio. With just a little care and patience, you’ll have a thriving ginger plant—and eventually, a homegrown harvest ready for your favorite teas, stir-fries, and remedies.
Happy planting—and enjoy the earthy magic of fresh ginger!
